First, Create an Event
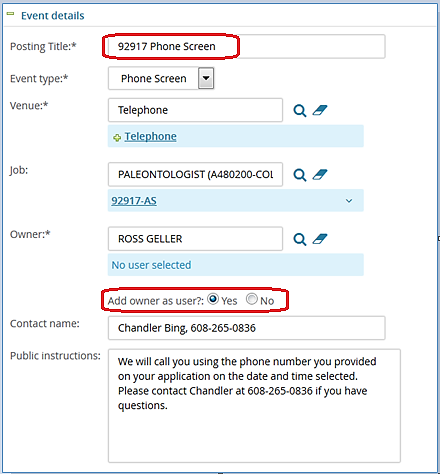
- To set up an event, choose New event from the PageUp menu and complete the details. Title your event something you will remember! You must include the PD/PVL number in your Event Name.
- Add the owner of the event as a user so the owner can track the process.

- After saving the event, add interview time slots as singles or bulk. Timeslots must be at least 24 hours in advance.
- Set a reminder for your invitees. Change the reminder radio button to “Yes” to send an email reminder to invitees. Save your event.

Second, Invite Applicants to the Event
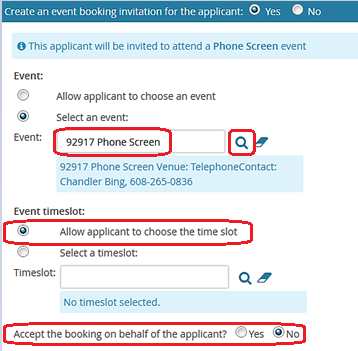
- After you create your event, invite applicants to select an interview time by changing applicant statuses to either Phone Screen or Interview.
- You must populate the Event field with the event you created. DO NOT leave this field empty. Click the magnifying glass and search to find your event.
- To allow applicants to choose their own time slot, leave the Event timeslot indicator as is. Do not accept the booking on behalf of the applicant.

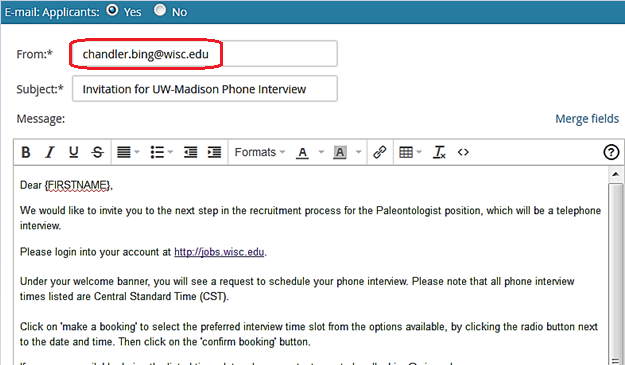
- Customize the communication template to share information and provide a positive applicant experience.
- Change the “From” field to your own or the interview contact’s email address so that any applicant replies will go directly to your team rather than the UW Jobs email inbox.

- Complete the status change and watch your applicant bookings roll in! As the event owner, you will receive an email when an applicant has accepted an event invitation.
Third, Update Your Calendar
- To add a booking to your Outlook calendar, navigate to Manage Events from the PageUp menu. From the Timeslots tab, click the Calendar icon next to the booking. You will be prompted to open the appointment, and Outlook will open the calendar appointment for you to customize and save.
Please refer to our help document, How to use Events, for step-by-step instructions on all things Events. Reach out to your TRE Specialist or your Division’s HR Office if you have questions. We are happy to help you become a TREMS pro!