UW HRS Security Provisioning is used to manage access to the UW Human Resource System (HRS).
Finding an Authorized Requester
People must be authorized to submit HRS access requests. The following table lists everyone currently authorized to submit HRS access requests. If you need HRS access and are not authorized to submit requests, please contact an authorized requester in your division to submit the request for you. To make changes to authorized requesters, please email the OHR HRIS team.
Note: not everyone on this list is authorized to approve requests after they are submitted. Refer to the Approving Requests – Divisions and OHR section for a list of authorized approvers.
Submitting Requests
Accessing HRS Requests
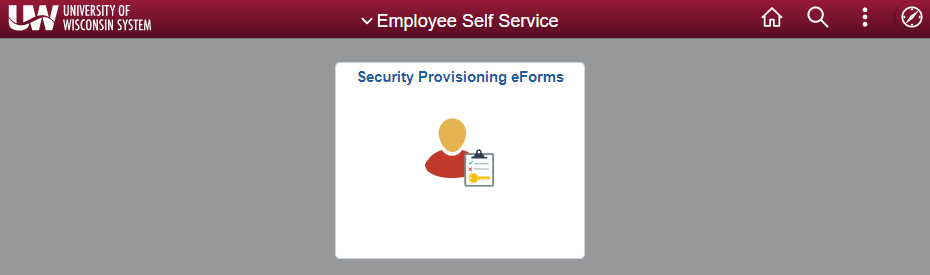
Authorized requesters start HRS access requests by logging in to HRS and clicking on the Security Provisioning eForms tile from the HRS Employee Self Service dashboard. To make it easier to find this page later, save it as a Favorite.
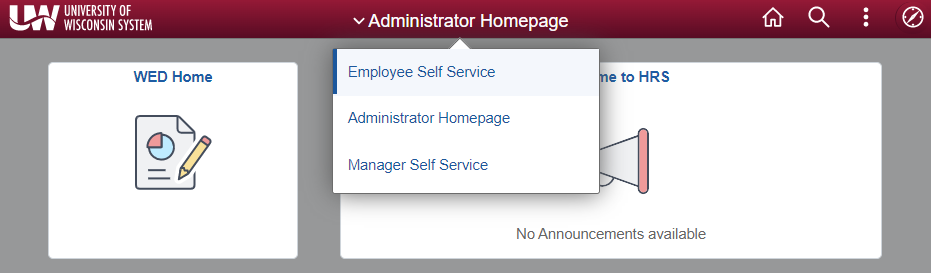
Note: Depending on the requester’s access and HRS settings, HRS may not open to the Employee Self Service dashboard by default. To change dashboards, click the dashboard menu along the top bar and then select Employee Self Service.
Request considerations:
- HRS access requests can be submitted up to 6 days in advance of an appointment/POI start date.
- If the user is transferring between positions, wait for the current position to end before submitting the request.
- You can accomplish multiple actions in a single request – for example, changing the user’s row security level, adding a security template, and adding additional roles to the templated roles.
Types of Requests
Single or Multiple Employee Requests
After clicking into Security Provisioning eForms, you will see the workflow for the New Provision Request by default, which allows you to submit a request for a single employee. If you will be requesting the exact same changes for multiple employees, you can select the New Multiple Employee Request option from the left menu instead.
New Provision Requests (Single Employee Requests)

The New Provision Request workflow allows you to request changes for a single employee’s HRS access.
- To begin a New Provision Request, search for the employee using the provided fields. It’s recommended to search by Empl ID since that is a permanent and unique identifier. If you search by name and receive multiple results, be sure to select the correct person.
- If the person has multiple positions, all positions will be shown underneath the search section – select the position that requires the access.
- After selecting the correct person and position, you will be taken to the New Request screen to enter the request details.
- For the Employee section, pay attention to the following fields:
- Effective Date – this is the date that you want the HRS access to become active. The field will default to the current date, but you may change it as appropriate.
- Request Type – choose Add Security to select all roles manually, Add Security Template to apply a pre-configured set of roles based on functional areas, or Remove Security to remove current roles.
- Note: Add Security Template is the preferred way of setting up new employees. Learn more about security templates.
- Note: You do not need to submit Remove Security requests if you just want someone’s access to be removed following the end of a position. Learn more about automatic access changes.
- Row Security Perm. List – if this needs to be changed from what’s shown in Old Row Security Perm. List, enter the new value. Otherwise leave it with the default value of the user’s current row security level. Learn more about row security permission lists.
Note about Student Help positions: Supervisor ID might populate blank or with an incorrect employee ID # for SH positions. Ensure that the Supervisor ID field contains the correct employee ID # for the student’s supervisor.
- Use the links in the Role Information section to check the user’s current access or to view the catalog of all HRS roles within HRS (alternatively: check out the UW-Madison catalogs for HRS and EPM roles for additional guidance!)
Add Security Request Type

The Add Security request type allows you to manually enter roles to add for the user. Add Security is best used to add additional roles for someone who already has HRS access or to set up users with specific and uncommon access needs. Trying to manually select roles for a user’s initial access is often confusing and inefficient and results in more access than the user really needs or redundant roles.
- If you know the exact Role Name, you can enter it into the Role Name field. Note that a Role Name looks like “UW_UNV_EPM_ALL_QRY_LBRY_NS”, not “BI HRS Qry-Non-Sensitive” which is the Description.
- If you do not know the Role Name, click on the magnifying glass symbol in the Role Name field to bring up a Lookup window. The Lookup window shows all roles in Role Name alphabetical order. You can search for a role by clicking on Search Criteria at the top of the Lookup window to expand the Search Criteria section and search by Role Name or Description. (Alternatively, use the UW-Madison catalogs for HRS and EPM roles to find the right role!) Do not include Additional Pay (Addl Pay) roles in your requests. Learn more about Addl Pay access.Make your searches more flexible by clicking the Show Operators link in the upper right, then change “begins with” to “contains”. This will look for your search term anywhere within the role name or description instead of only at the beginning.

Click image to enlarge - If you need to add additional roles to the request, click the + (plus sign) button in the Insert A Row column to add another role row.
- If you accidentally add too many rows, click the – (minus sign) button in the Delete A Row column of the row you want to delete.
- Write a comment and click the Submit button to submit the request. Submitting the request will begin the approval process.
Add Security Template Request Type
The Add Security Template request type allows you to select a pre-configured security template to automatically add a set of roles specifically selected to meet the common business needs of different functional areas. Add Security Template is best used to set up initial access for a new user performing HR, Payroll, or Finance functions, or users who might only need to view data in HRS without entering data themselves (department administrators, IT staff, etc.)
- Click the magnifying glass symbol in the Template ID field to open a templates Lookup window.
- Select the appropriate template for the user’s job functional area from the list of templates.
- If user’s work involves multiple functional areas (for example, doing both HR and Payroll work), click the + (plus sign) button in the Insert A Row column to add another template row and select an additional template.
- If you accidentally add too many rows, click the – (minus sign) button in the Delete A Row column of the row you want to delete.
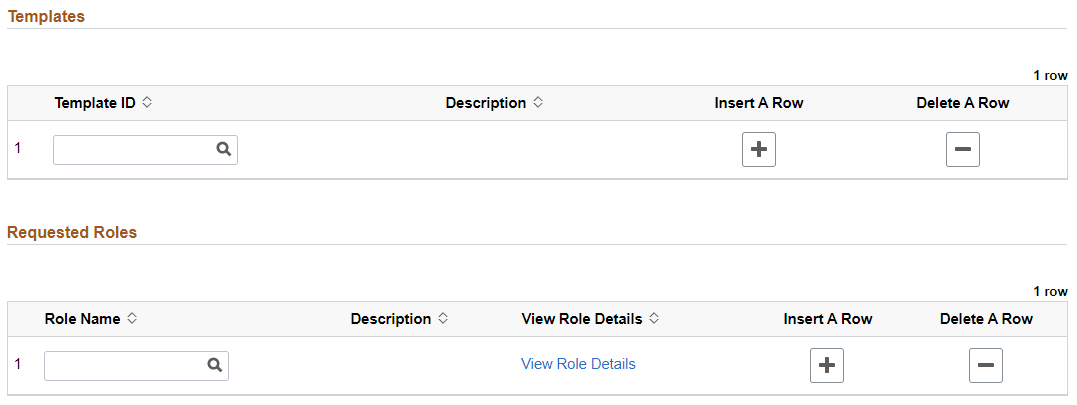
- The roles included in your selected template will automatically fill in to the Requested Roles section below.
- You can change the roles added by the templates if needed. If the user needs additional roles not included in the templates or if the selected template includes roles that the user doesn’t need, you can add or remove roles in the Requested Roles section. Follow the Add Security request instructions to make changes to roles.
- Write a comment (be sure to provide an explanation if you have added or removed roles) and click the Submit button to submit the request. Submitting the request will begin the approval process.
Remove Security Request Type

The Remove Security request type is used to remove some or all of a user’s roles. Note that you do not need to submit Remove Security requests if you just want someone’s access to be removed following the end of a position (learn more about automatic access changes). Examples for when to submit Remove Security requests include:
- The user’s work changes and they no longer need access to certain HRS pages or features.
- Intentionally removing access before the user’s position ends (for example, someone whose position remains active while they use up leave balances but they are no longer actively working).
- A review of a user’s access shows they have roles they don’t need for their work or roles that are redundant with other roles they have.
Follow these steps to select roles to remove:
- After selecting the Remove Security request type, a Remove All Roles? toggle will be added into the Role Information section and all of the user’s current roles for the selected position will populate in the Requested Roles section.
- If you need to remove all of the user’s roles for the selected position, click the Remove All Roles? toggle. The Remove All Roles? toggle as well as the Remove? toggle for each individual role will turn to “Yes”.
- If you are only removing some of the user’s current roles, click the Remove? toggle next to each role you want to remove to change it to “Yes”.
- Write a comment (be sure to provide an explanation of why you need to remove roles) and click the Submit button to submit the request. Submitting the request will begin the approval process. Note that Remove Security requests will not email the user since removing access does not require a compliance agreement.
New Multiple Employee Requests
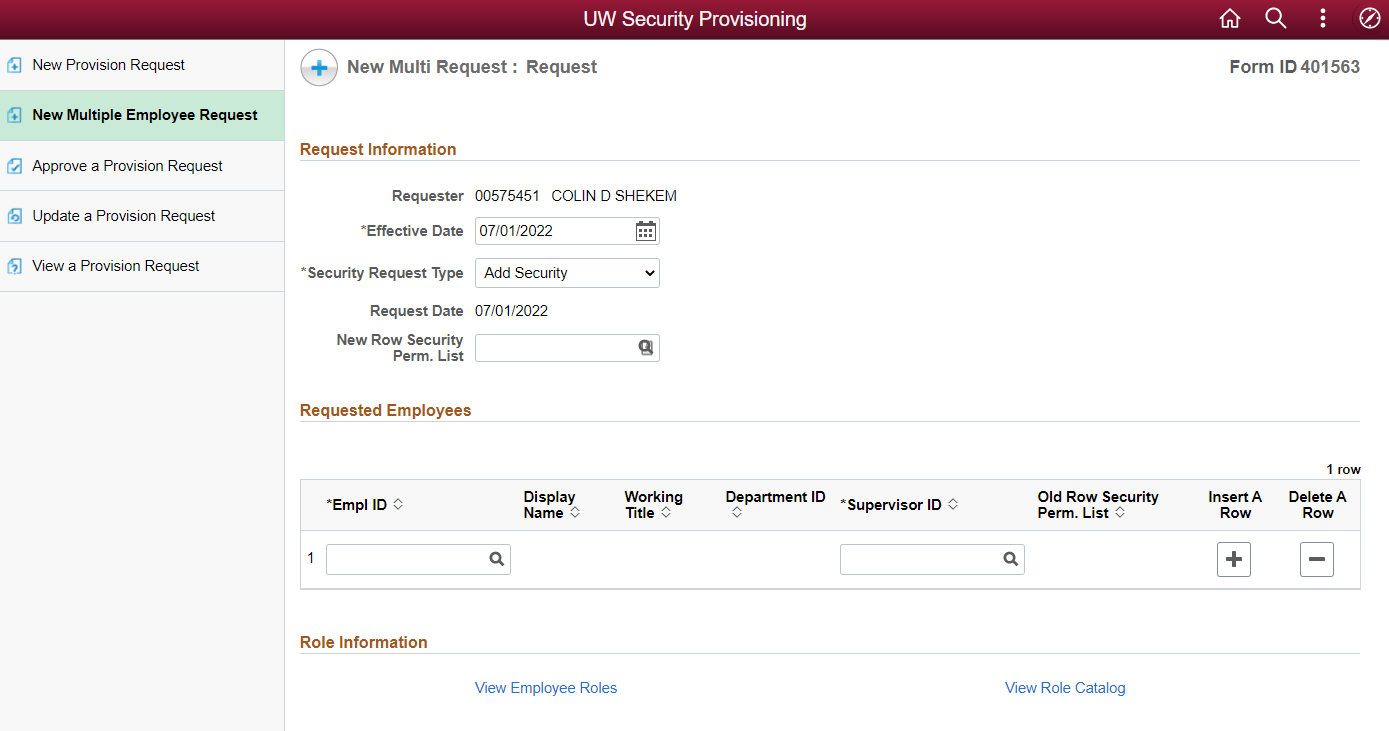
The New Multiple Employee Request workflow allows you to request the same changes for multiple employees at once. Most often this is used to add roles for multiple employees with current access who will all be working on a specific project or new business need.
- For the Request Information section, pay attention to the following fields:
- Effective Date – this is the date that you want the HRS access to become active. The field will default to the current date, but you may change it as appropriate.
- New Row Security Perm. List – if you will be changing the row security levels for all users to the same new level, enter the new value in this field. Otherwise, leave the field blank to keep users’ row security levels (shown in each user’s row in the Requested Employees section) as they currently are. Learn more about row security permission lists.
Note about Request Type: It is not recommended to use Add Security Template or Remove Security request types in Multiple Employee Requests. Those workflows have not been optimized at this time. Multiple Employee Requests should only be used for the default Add Security request type.
- In the Requested Employees section, enter the employee ID # of the first user in the Empl ID field, then click the magnifying glass icon. Do not click the magnifying glass icon without entering an Empl ID – this causes HRS to load all employees which takes a very long time.
- Select the position requiring access from the list of the user’s positions in the Lookup window. The Empl ID field will be populated with a string including Empl ID, Empl Rcd, and UDDS (example: 00123456:0,A022045) to designate the selected position. All other fields will populate with the correct information for the selected position as well.
- Note about Student Help positions: Supervisor ID might populate blank or with an incorrect employee ID # for SH positions. Ensure that the Supervisor ID field contains the correct employee ID # for the student’s supervisor.
- To add additional users to the request, click the + (plus sign) button in the Insert A Row column to add another role row.
- If you accidentally add too many rows, click the – (minus sign) button in the Delete A Row column of the row you want to delete.
- Use the links in the Role Information section to check the user’s current access or to view the catalog of all HRS roles within HRS (alternatively: check out the UW-Madison catalogs for HRS and EPM roles for additional guidance!)
- Follow the instructions for the single employee Add Security request type to complete the Requested Roles and Comments sections and submit the request. HRS will create separate requests for each user included in the request which will all follow the standard approvals process.
Comments
Comments are required for all requests. Comments explain the rationale for the request so it’s easier for division and OHR approvers to determine what the user needs to do, if the requested access is appropriate for that work, or if the requested access could be revised to be more appropriate and efficient.
Comment considerations:
- Indicate which templates were used and if any roles were added or removed.
- If template was not used, provide a brief explanation of why not.
- If the row security level is greater than the user’s appointing division, provide a brief justification for why the user needs to access data outside their division.
- If submitting Remove Security, explain why roles are being removed. (Remember that Remove Security requests do not need to be submitted to remove someone’s access when their position ends!)
Row Security, Roles, and Security Templates
Row Security Permissions List
The Row Security Permissions List (displayed in HRS as “Row Security Perm. List” and often shortened to just “row security”) describes the data that the user can access within the pages they’re authorized to use based on their roles. The row security level begins with UW_DP_ and then ends with a business unit or UDDS. For example:
- UW_DP_A022045 – access to jobs in A022045 subdepartment
- UW_DP_A0220 – access to jobs in A0220 department
- UW_DP_A02 – access to jobs in A02 division
- UW_DP_UWMSN – access to jobs in UW-Madison
Row security should be the smallest unit that still fulfills the user’s work needs. However, a user can only have one row security level, which sometimes makes it necessary to move “up” a level. For example, if a user needs to see job data within A07 and A53, they would need a row security level of UW_DP_UWMSN as the smallest unit that contains both A07 and A53 since they cannot have specific access to A07 and A53 (be sure to explain this in the comments!)
Roles
Roles determine the pages and features that the user can access within HRS, with specific data access determined by their row security permissions list. There are many roles and often roles have some degree of overlap with other roles, so working with roles can be confusing and overwhelming. To make it easier, it is recommended to use security templates to set up new users and then request additional individual roles as additional needs are identified.
Some technical users might also need access to the Enterprise Performance Management (EPM) data warehouse, which stores data entered into HRS to use in custom queries and applications. There are specific roles for EPM that provide the user access to different sets of data tables. Learn more about EPM on the UWSS Data Warehouse site (requires NetID login).
Both HRS and EPM roles share a common set of functional area abbreviations, which can help you determine appropriate roles for different needs:
- AM — Absence Management – includes access to information about leaves taken, balances, entitlements, etc.
- BI — Business Intelligence – includes access to reporting functions such as PayCheck, Commitment Accounting, OBIEE/UWBI, etc.
- BN — Benefits – includes access to various elements of employee benefits
- DB — Database – includes access to data tables/views (EPM only)
- FI — Finance – includes access to information about funding, budgets, salary cost transfers, etc.
- HR — Human Resources – includes access to information about persons, jobs, positions, etc.
- IR — Interactive Reporting – includes access to data tables/views (EPM only)
- PY — Payroll – includes access to information about additional payrolls, direct deposites, paychecks, retro pay, taxes, etc.
- TL — Time and Labor – includes access to information about timesheets, supervisors, payroll coordinators, schedules, etc.
Use the following UW-Madison role catalogs to help you navigate roles:
Download the UW-Madison HRS Role Catalog
Download the UW-Madison EPM Role Catalog
UWBI/OBIEE Roles
Just need to access to UWBI/OBIEE reports? Skip the catalogs and select the appropriate role from below.
- BI HRS Qry-Non-Sensitive (UW_UNV_EPM_ALL_QRY_LBRY_NS) – access to all non-sensitive UWBI/OBIEE reports
- This role is included in HR, Payroll, and Finance security templates and is appropriate for most users.
- BI HRS Queries-Sensitive (UW_UNV_EPM_HR_QRY_LBRY_S) – access to both sensitive and non-sensitive UWBI/OBIEE reports
- This role requires justification in the request comment for why the user needs to access sensitive data. This role is typically only given to HR staff at the division level, but exceptions may be made if a user has a specific business need for it.
Security Templates
Security templates are pre-configured sets of roles created from the input of common user types:
| wdt_ID | Template Name | Update Access | View Access | UWBI/OBIEE Access |
|---|---|---|---|---|
| 1 | Division HR |
|
|
Non-sensitive |
| 2 | Division Payroll |
|
|
Non-sensitive |
| 3 | Division Finance |
|
|
Non-sensitive |
| 4 | Department HR |
|
|
Non-sensitive |
| 5 | Department Payroll |
|
|
Non-sensitive |
| 6 | Department Finance |
|
|
Non-sensitive |
| 7 | View Only | None |
|
None |
These templates are the result of many discussions between OHR and HRS users from throughout campus. Selecting a template automatically adds a set of roles to the request that HRS users in that template’s functional area identified as universal needs. Refer to Guidance for Determining Appropriate UW–Madison HRS Templates for help with identifying the appropriate template(s) and whether additional Optional and Special Request security roles are also needed.
Download the UW-Madison HRS Security Templates Guide
We want your input! If you have any feedback about these templates, email the OHR HRIS team!
Automatic Access Changes
HRS automatically makes changes to HRS access in reaction to certain job changes.
- If a person’s position ends – including if they have transferred into a new position – HRS automatically removes all roles from that person on the day after the job end date (final day actively in position).
- If a person’s UDDS changes within the same position, HRS automatically resets the person’s row security permissions list to DEFAULT, which is limited to the position’s subdepartment.
Approving Requests
Users
Requests to add access require the user to accept an electronic compliance agreement confirming they will use their HRS access appropriately. The user must accept the agreement within 14 calendar days after receiving the email or the request will be automatically cancelled and a new request will need to be submitted.
The user must have completed the Level 2 Credentialing process (Digital ID Identity Proofing and identity verification with DoIT) to access the compliance agreement.
- User will receive an email from UWSystemHR@uwss.wisconsin.edu with subject Action Required: Compliance Agreement for Request [request number].
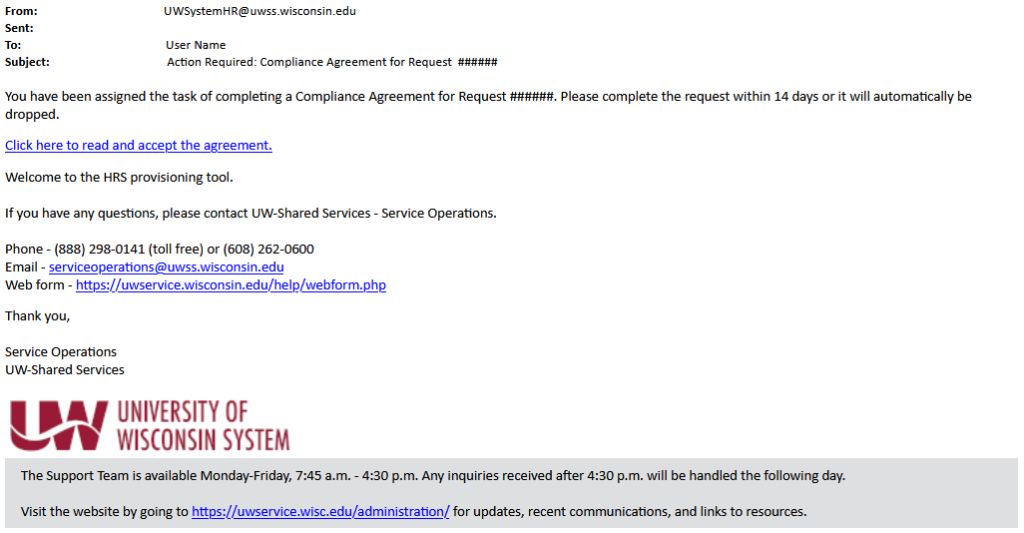
Click image to enlarge - Click the Click here to read and accept the agreement link to open the compliance agreement for the request.
- If you get an error after trying to open the agreement link, make sure you have completed the Level 2 Credentialing process linked above.
- Read the agreement and click the Yes button at the bottom to agree to the HRS terms of usage. Download an example of the compliance agreement for future reference.

Can’t find the compliance agreement email? Follow the UWSS Approving the HRS Security Compliance Agreement in HRS KB document to find your agreement in HRS.
Divisions and OHR
Requests to add access require review by authorized division approvers (called the “Dean/Director” approval group in HRS) first, then OHR HRS Data Custodians. Requests to remove access only require OHR HRS Data Custodian review.
The following table lists all currently authorized division approvers. To make changes to authorized division approvers, please email the OHR HRIS team.
Division and OHR approvers look for the following things in their reviews:
- If new row security level is requested, it is appropriate for the user and the position.
- Requested roles are appropriate for the user and the position.
- Requested roles do not unnecessarily create Separation of Duties conflicts.
- Requested roles are not redundant with each other or existing access (for example, adding HR View Only when user already has HR Administrator (Update HR) or adding both sensitive and non-sensitive UWBI/OBIEE roles.)
Each approver group must review the request within 6 calendar days after receiving the email or the request will be automatically cancelled and a new request will need to be submitted.
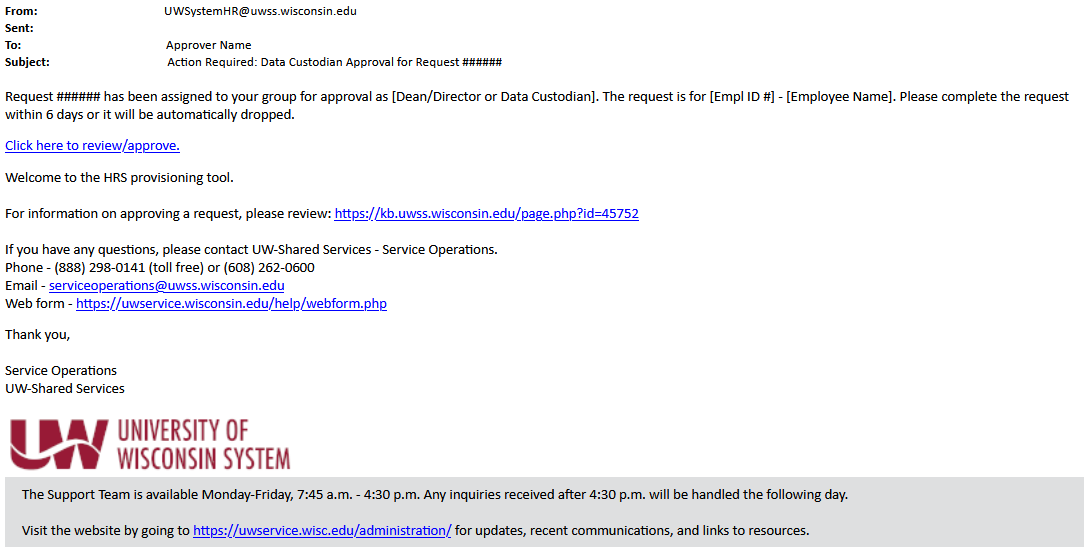
- Approvers will receive an email from UWSystemHR@uwss.wisconsin.edu with subject Action Required: [Dean/Director or Data Custodian] Approval for Request [request number].

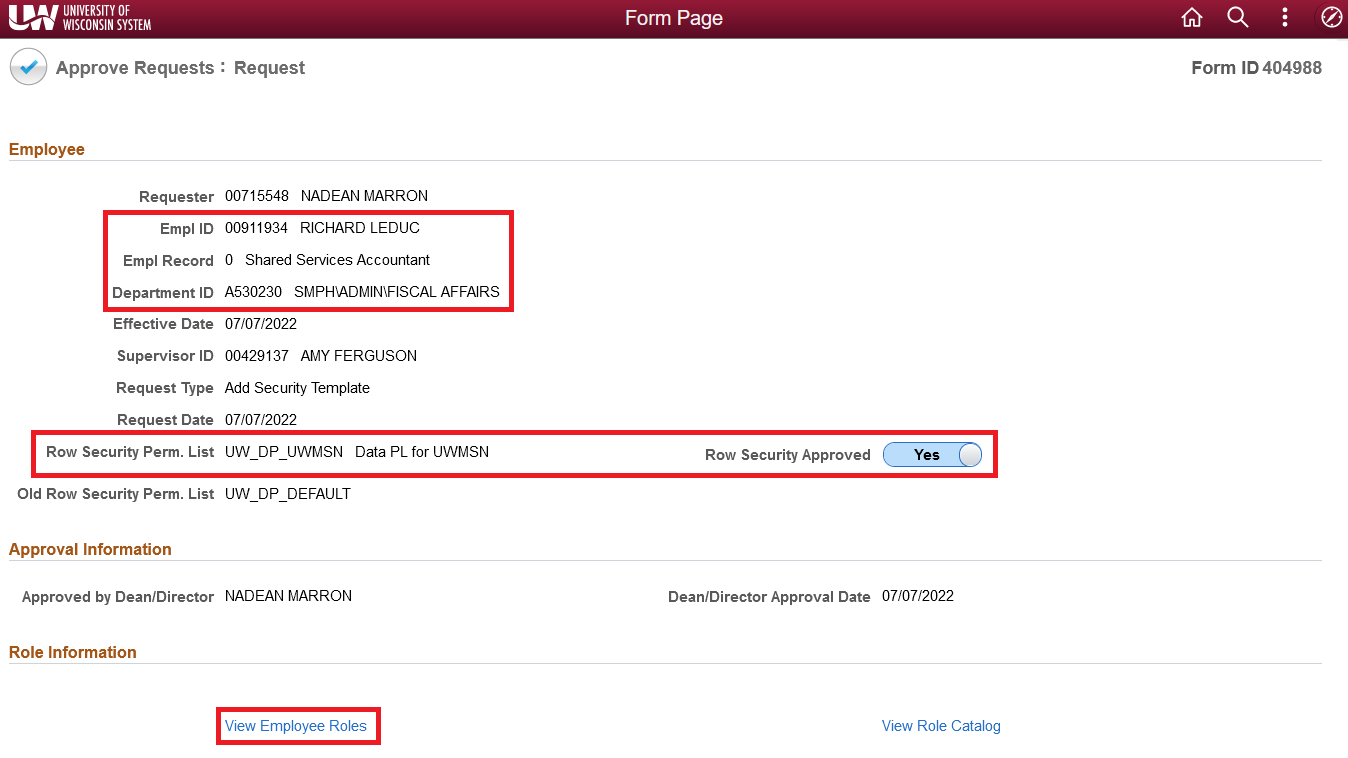
Click image to enlarge - Click the Click here to review/approve link to open the request in HRS.
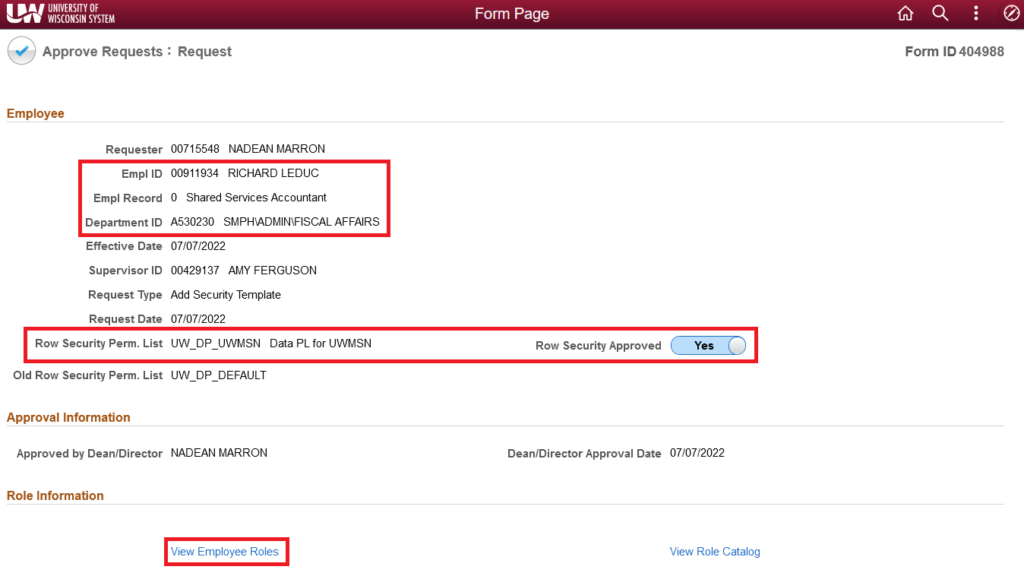
- For the Employee and Role Information sections, pay attention to the following fields:
- Empl ID provides the Employee ID # and user name for the selected user.
- Empl Record provides the Empl Rcd # and Business Title for the selected position.
- Department ID provides the UDDS and department name for the selected position.
- If Row Security Perm. List displays a value, check the new row security level requested. If the new row security level is appropriate for the user and position, leave the Row Security Approved toggle set to “Yes”, otherwise click the toggle to change to “No”.
- Click the View Employee Roles link to check the user’s current access.
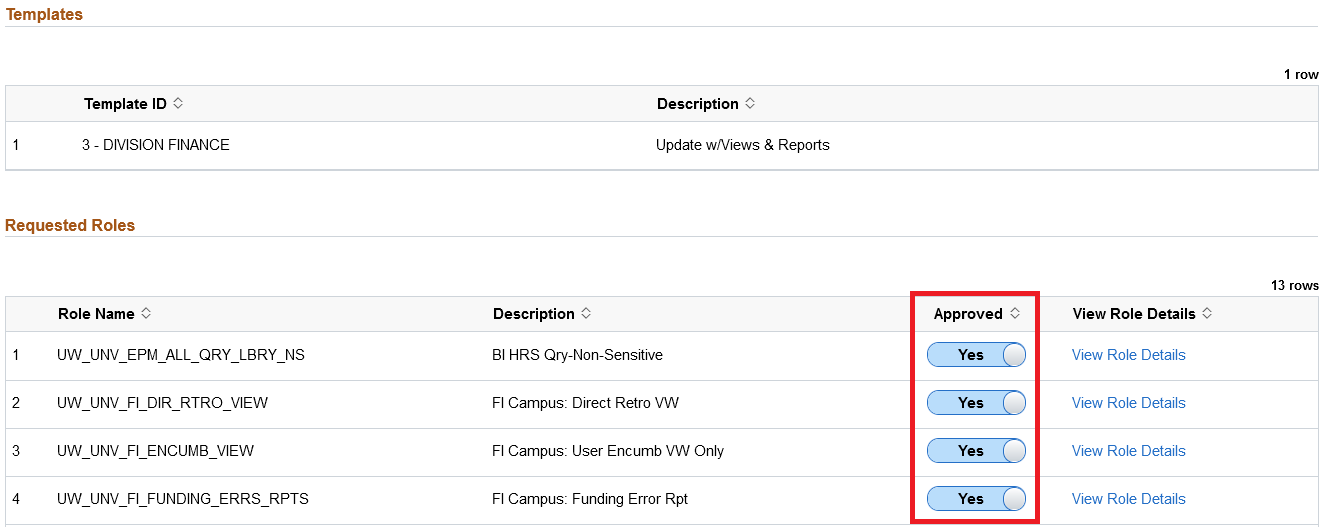
Click image to enlarge
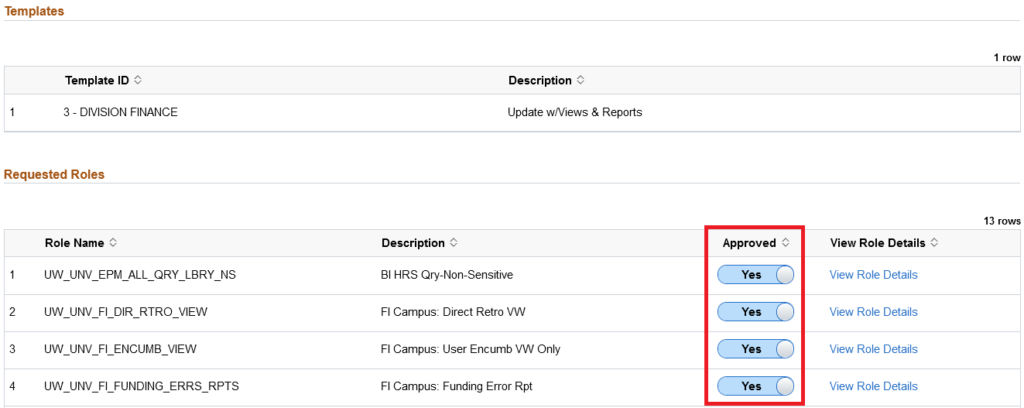
- If the request was submitted as Add Security Template, the selected templates will be listed in the Templates section. Ensure that the selected templates are appropriate for the position (for example, you might want to ask the requester for clarification if they are requesting a Division Finance template for a Graphic Designer position.) Note however that roles can be changed from what’s included with templates, so you still need to review the requested roles even if the selected templates are appropriate.
- Review each requested role to ensure that it is appropriate for the selected user and position, doesn’t create an unnecessary Separation of Duties conflict, and isn’t redundant with other roles in the request or in the user’s current access. If you don’t know what a specific role does, click the View Role Details link to go to a description of the role in HRS or refer to the UW-Madison role catalogs.If the role is appropriate, leave the Approved toggle set to “Yes”. If the role is not appropriate but all other requested access is appropriate, click the Approved toggle to switch to “No”. Any roles with Approved set to “No” will not be granted even if you approve the request.
Click image to enlarge - Write a comment confirming what you did and did not approve and why. If you are denying or pushing back the request, explain the reason for denial or the questions/changes for the requester.
- Click the button for your review decision:
- Deny – completely cancels the request and does not apply any of the requested access. This is typically only used if after discussing the request with the requester it is agreed that the user doesn’t require any changes to HRS access.
- Push Back – returns the request to the requester to make changes. Be sure to specify in the comments what changes you need the requester to make.
- Approve – approves the requested access (excluding row security or roles that have been set to “No”). If a Dean/Director selects Approve, the request will move forward to the OHR HRS Data Custodians. If an OHR HRS Data Custodian selects Approve, it will complete the request and the approved access will be applied during the next scheduled security provisioning batch process (typically about once per hour.)

Click image to enlarge
Can’t find the approver email? Follow the UWSS Approving HRS Security Role Requests in HRS KB document to look up the request in HRS.
Training
Security Awareness Training
New Users
All new core HRS users (any HRS user that has access to other people’s data, excluding manager self-service, time reporting, and e-benefits), including users who only have UWBI/OBIEE access, must complete an online HRS Security Awareness course. Users must complete the course within 30 calendar days after receiving the email or they will be locked out of HRS. Users are able to access HRS before completing the training, but they will lose access if they do not complete the training within 30 days.
- Users who need to complete the HRS Security Awareness course will receive an email from serviceoperations@uwss.wisconsin.edu with subject Welcome to HRS! Emails are sent at 4PM on the day that the user’s access is granted.
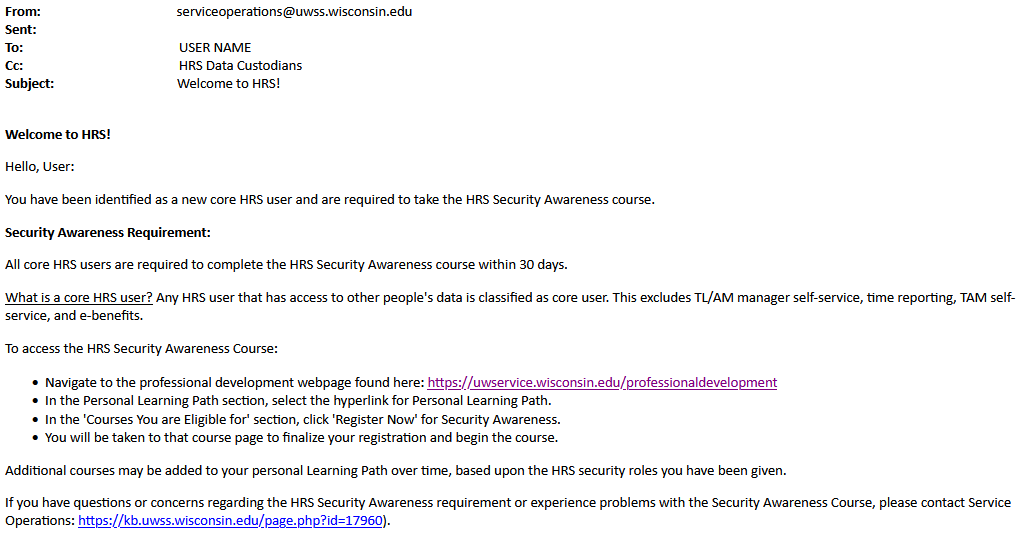
Click image to enlarge - Follow the instructions in the email to navigate to and complete the HRS Security Awareness course online within 30 days of receiving the email.
- Users will be emailed ahead of time if their access is at danger of being locked due to not completing the training. After 30 days, the user’s HRS account will be locked and they will need to complete the training and send an email to UW-Shared Services (serviceoperations@uwss.wisconsin.edu) to have their account unlocked and regain HRS access. This will not require a new HRS access request.
- If the user still has not completed the training after 60 days, their HRS roles will be removed and their HRS accounts will be unlocked. A new HRS access request will need to be submitted to grant them HRS access again.
Existing Users
Existing core HRS users must complete the HRS Security Awareness course annually. Users will receive an email from UWSS when they are required to complete a new annual training. If a user does not complete the training within the timeline described in the email, their HRS account will be locked and they will need to complete the training and send an email to UW-Shared Services (serviceoperations@uwss.wisconsin.edu) to have their account unlocked and regain HRS access. This will not require a new HRS access request.
Additional Pay (Addl Pay)
Employees who perform Payroll functions may need access to Additional Pay (often shortened to “addl pay”) pages in HRS. Do not add Addl Pay roles into your requests! These roles require training before they are granted.
If an employee needs Addl Pay access, please email OHR Payroll (Payroll@ohr.wisc.edu), who will ensure the required training is complete and then notify UWSS and OHR HRIS to submit requests for the appropriate roles.
Optional Additional Training
UW-Shared Systems
Depending on the user’s roles, there may be additional optional HRS training they can complete. Visit the UWSS My Learning Path page to check additional courses you are eligible for.
UW-Madison
The UW-Madison Office of Human Resources offers a few courses online and in-person to help HRS users learn how to navigate the system. Visit the Office of Talent Management online catalog to register for any of these courses.
- Introduction to UW-Madison – HRS and Related Technologies – Online – This course provides an overview of HR technologies used at UW–Madison such as HRS, JEMS, TREMS. Topics covered are location of resources, basic human resources concepts, and an overview of the commonly used technologies. This course provides a foundation for other HRS and related technology learning opportunities.
- HRS Basics Part 1 – Online – HRS Basics is the first in a series of classes for HR and Payroll professionals at UW Madison. This class will cover the general use for Modify a Person, Job Data and Time and Labor Security in HRS. In addition, you will learn how to use the payroll calendar and how the timing of data entry into HRS affects an employees payroll.
- HRS Basics Part 2 – In-Person – HRS Basics is the first in a series of classes for HR and Payroll professionals at UW Madison. This class will cover the general use for Modify a Person, Job Data and Time and Labor Security in HRS. In addition, you will learn how to use the payroll calendar and how the timing of data entry into HRS affects an employees payroll.
Security
Separation of Duties (SOD)
SOD Conflicts
When setting up HRS access, you must maintain separation of duties (often referred to as “SOD”) to the fullest extent possible. There are three main scenarios to avoid in users’ HRS access to maintain separation of duties:
- HR1 – user’s access would allow them to:
- hire, update, or terminate employees
and - create, edit, or approve timesheets
- hire, update, or terminate employees
- HR2 – user’s access would allow them to:
- hire, update, or terminate employees
and - create or update direct deposit information
- hire, update, or terminate employees
- PY1 – user’s access would allow them to:
- hire, update, or terminate employees or approve timesheets
and - create online checks or print or distribute paper checks
- hire, update, or terminate employees or approve timesheets
Sometimes conflicts are unavoidable based on a work unit’s administrative structure. The goal is to minimize conflicts as much as possible so that users can’t create SOD errors.
SOD Errors
When a user enters a combination of HRS transactions that match the SOD scenarios above, it creates an SOD error. If it is unavoidable for a user to have access that creates an SOD conflict, the work unit must review its business processes to make sure that users will not create SOD errors. For example, if a user has access to update job data and also supervises another employee, the work unit’s business processes must include having someone else update job data or approve timesheets for the employee so that the user doesn’t do both and create an SOD error.
At least one person for each division has access to view reports of SOD errors in the HRS Workflow Exception Dashboard (WED). Divisions are responsible for checking the WED SOD reports at least once per week and investigating and resolving their SOD errors. If an error remains on a report for 14 days, OHR HRIS will email the division SOD reviewers to make sure the error is investigated and resolved as soon as possible. Learn more about processing the WED SOD reports in the UWSS KB.
Learn more about Separation of Duties on the UWSS Security page in the Separation of Duties section or download a compressed folder of SOD resources.
Annual Attestation
Once per year, each UW business unit completes a comprehensive review of its users’ HRS and EPM access to remove inappropriate access and attest that the remaining access is appropriate. The OHR HRIS team will distribute reports of UW-Madison users’ access to division approvers with a specific deadline to review and return.
Frequently Asked Questions (FAQs)
How do I check someone’s current access?
Currently, using New Provision Request and clicking the View Employee Roles link is the best way to check a user’s existing access, even if you won’t be requesting any changes.
Someone unexpectedly lost their access because of a job change – can I see or request the access they used to have?
No – HRS does not keep historical records of access over time so there is no way to look up someone’s previous access once it is removed. Use the resources on this page to help you submit a request for whatever access they need.